OAuth for Sentry on Ivanti EPMM
OAuth is supported with Ivanti Standalone Sentry for Office 365.
The following scenarios must be compliant for OAuth to function correctly:
-
The email client must support OAuth (iOS Native Mail, iOS Email+ and Android Email+)
-
UEM must push an OAuth configuration to the email client
-
UEM must enable Sentry for OAuth
Sentry 9.14.0 and 9.15.0 supports Azure AD Conditional Access Policy.
For more information, see Configuring conditional access policy in Azure AD.
Configuring Sentry on Ivanti EPMM for OAuth
You must configure Ivanti Standalone Sentry to enable OAuth and provide the endpoints.
Before you begin
-
Verify that you have Sentry 9.14.0 or later and Ivanti EPMM 11.0.0.0 or later.
Procedure
-
Login to Ivanti EPMM with admin credentials.
-
Click Services > Sentry.
-
Click Add New > Standalone Sentry.
-
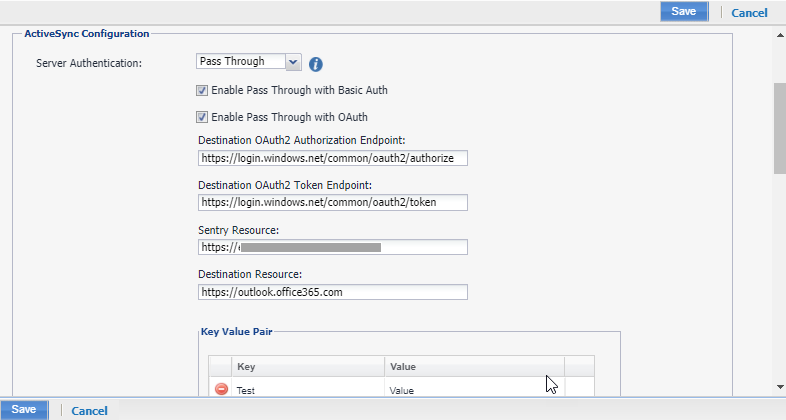
Select Enable ActiveSync and enter the following details for OAuth.
-
Select Pass Through for Server Authentication.
-
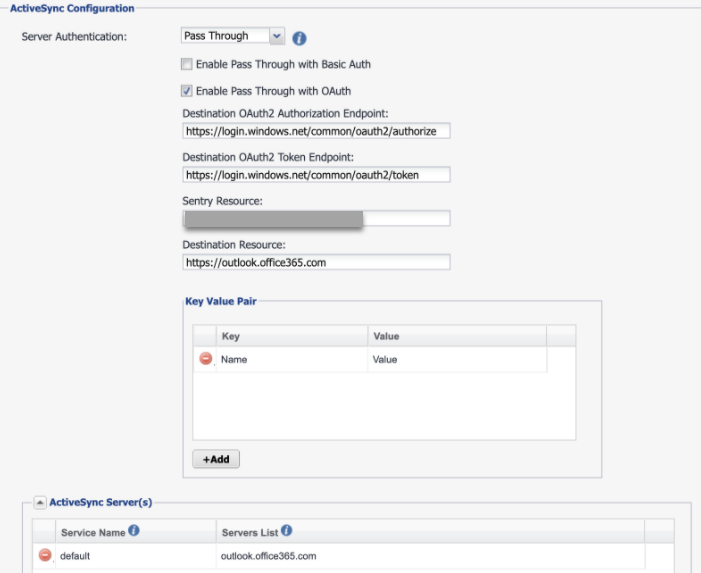
Select Enable Pass Through with OAuth.
-
Destination OAuth2 Authorization Endpoint: "https://login.windows.net/common/oauth2/authorize"
-
Destination OAuth2 Token Endpoint: "https://login.windows.net/common/oauth2/token"
-
Sentry Resource: https://<SentryHostName>
-
Destination Resource: https://outlook.office365.com/
If Active Sync servers are not added by default, then configure Active sync server as outlook.office365.com.
-
-
Click Save.
Configuring OAuth for Email+ through Sentry on Ivanti EPMM
After the iOS Email+ application is installed the configuration must be pushed to the device.
Before you begin
-
Verify that you have installed iOS Email+ application.
Procedure
-
Login to Ivanti EPMM with admin credentials.
-
Click Services > Sentry.
-
Click Add New > Standalone Sentry.
-
Select Enable ActiveSync and enter the following details for OAuth.
-
Select Pass Through for Server Authentication.
-
Select Enable Pass Through with OAuth.
-
Destination OAuth2 Authorization Endpoint: "https://login.windows.net/common/oauth2/authorize"
-
Destination OAuth2 Token Endpoint: "https://login.windows.net/common/oauth2/token"
-
Sentry Resource: https://<SentryHostName>
-
Destination Resource: https://outlook.office365.com/
If Active Sync servers are not added by default, then configure Active sync server as outlook.office365.com.
-
-
Click Save.
Configuring iOS native email configuration with OAuth
Before you begin
-
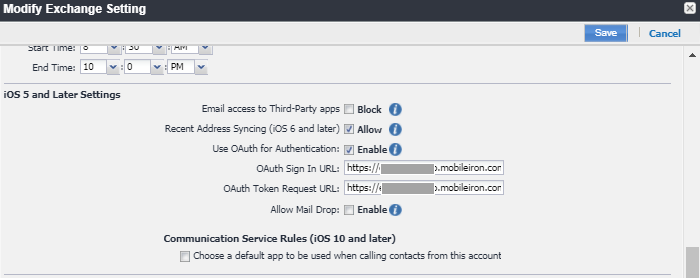
Verify that you have enabled "Use OAuth for Authentication" for iOS 5 and later versions.
With iOS 14 and newer versions, password prompts appear on the devices for iOS Native email client when the exchange profile with OAuth configuration is pushed to the devices.
When you configure an OAuth feature, Sentry must be configured with Active Sync only and do not select AppTunnel. For AppTunnel use a different Sentry.
Procedure
-
Login to Ivanti EPMM with admin credentials.
-
Click Policies and Configs.
-
Click Edit on the exchange configuration.
-
Enable Use OAuth for Authentication.
-
Under iOS 5 and Later Settings, enter the following details:
OAuth Sign In URL: https://<SentryHostName>/proxyservice/oauth2/authorize
OAuth Token Request URL: https://<SentryHostname>/proxyservice/oauth2/token
-
Click Save.
Configuring Android and iOS Email+ with OAuth
For more information on configuring Android or iOS Email+ for OAuth, see Email+ Product Documentation.
When you configure an OAuth feature, Sentry must be configured with Active Sync only and do not select App Tunnel. For App Tunnel use a different Sentry.
KVPs for Email+ Configuration
For OAuth, ensure to set "eas_min_allowed_auth_mode" to "modern_auth" and provide the modern_auth_authority_url and modern_auth_resource_url for appropriate OAuth configuration:
-
eas_min_allowed_auth_mode: modern_auth
-
modern_auth_authority_url: https://<SentryHostname>/proxyservice
-
modern_auth_resource_url: https://<SentryHostname>
For OAuth Email+ CBA user, the following KVP must be provided:
-
email_login_certificate = <CBACertificateName>.pfx
Configuring conditional access policy in Azure AD
You can configure the conditional access rules in Azure for OAuth to function correctly.
-
Login to Azure portal with admin credentials.
The admin has to be super admin who has premium features to configure Conditional Access rules. -
Click Azure AD Conditional Access > Named Locations > IP Range Locations > New IP Range Location.
-
Click Add and enter the IPv4 or IPv6 address range.
-
Configure a name and Sentry IP address with Subnet > Add > and enable Mark as Trusted location > Create.
-
On the Home tab, click Conditional Access Policies > Create New Policy.
-
Under Users and Groups, select Users and Groups.
-
Search for the appropriate Users or Groups and click Select.
-
Under Cloud apps or actions, select apps > Office 365.
-
Under Conditions > Locations > Any Location > Configure "Yes" under Include to "Any Location".
-
Under list of locations, select Selected locations under Exclude.
-
Select Grant access as block access > require one of the selected controls.
-
Select Enable Policy > On> Create.